How to Migrate Yandex Mail to Gmail Step by Step?
Looking for a way to migrate Yandex Mail to Gmail? I have got you covered. Whether you want to learn how to set a forwarding rule that will push all new email messages from Yandex to Gmail or utilize Gmail’s internal import feature, I explain every method in great detail.
Table of Contents
- Why Migrate?
- Whitelist Yandex Emails in Gmail
- Make Yandex to Gmail Forwarding Rule
- Confirm Yandex Forwarding Address in Gmail
- How to Manually Forward Existing Mail?
- Ready Yandex Account
- Use Gmail’s Email Import Facility
- Use Email Clients
- Best Way for Yandex to Gmail Migration
- Conclusion
- Frequently Asked Questions
You will also see how email clients can be utilized to perform the transfer and what each of those manual methods lacks that can be fulfilled with a state-of-the-art utility. So start by reading the list of complaints that other users like yourself have against Yandex Mail and see if your own reason for changing email providers matches theirs.
While this guide focuses on Gmail, if you are considering Microsoft’s ecosystem, you can also learn how to migrate from Yandex to Office 365.
Why Migrate Yandex Mail to Gmail?
Reduce ad bloat. Yandex Inbox looks less like an email service UI and more like an ad spam board. You get constantly bombarded by endless crypto ads. Gmail does show ads, but it is of much higher quality and feels less intrusive.
Gmail gives users access to a complete Google ecosystem with apps like Google Drive, Docs, Sheets, and Slides. Moreover, all of the latest advancements made to the Google Gemini model are readily available for users to try out for themselves. Such diverse and multipurpose app support is missing from Yandex.
Deliverability Issues: Email messages sent from Yandex usually end up in spam or junk folders. This is further exaggerated by geopolitical tensions that may make you lose access to your Yandex account without warning.
All of these are more than enough to convince most of the Yandex users to switch over to Gmail. So let’s start out by setting a forwarding rule.
How to Whitelist Yandex Emails in Gmail to Prevent Spam Blocking?
This is mandatory to prepare your Gmail Account so that you are able to migrate Yandex mail to Gmail without fail.
Step 1. Open any browser and log in to your Gmail Account.
Step 2. At the top right corner, click the settings cog.
Step 3. Select the “See all settings” option from the expanded menu.

Step 4. On the Settings page, switch to the “Filter and Blocked Addresses” tab.
Step 5. Under “The following filters are applied to all incoming mail:” click the “Create a new filter” button.
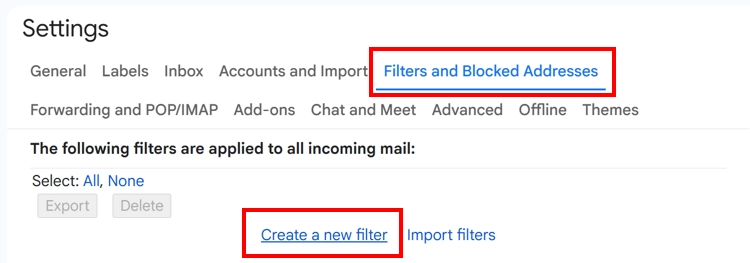
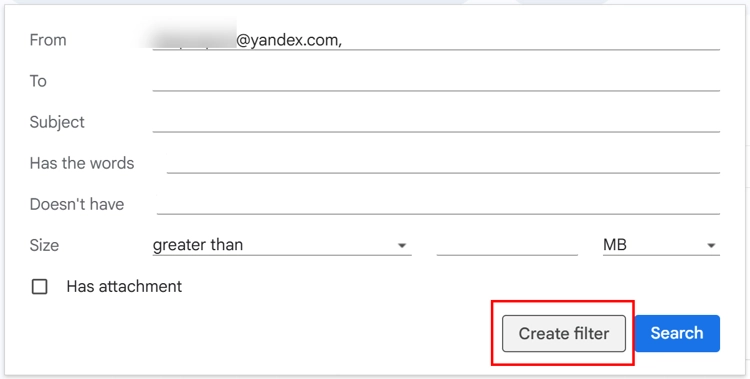
Step 6. Inside the Filter Box, “enter *@yandex.com address in the From field“, keep all other fields blank (unless you want to see specific messages inside your Gmail account), and click “Create filter”.
Step 7. The Filter box then asks you what to do “When a message is an exact match for your search criteria:” there you have to mark the checkbox saying “Never send it to Spam” and hit “Create Filter”.
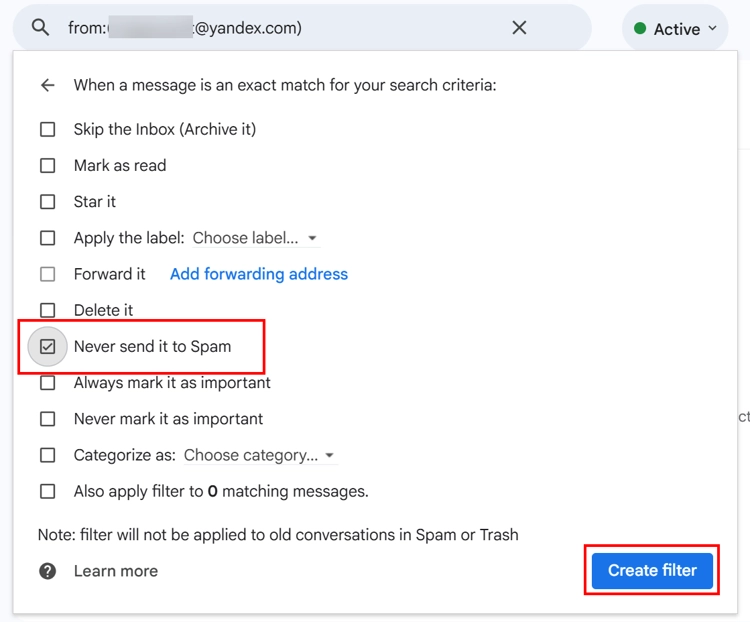
Now every message from any Yandex domain will be treated as safe to show and won’t end up in spam.
Step-by-Step: Create a Yandex to Gmail Forwarding Rule
Go to your Yandex account login page and continue from there to migrate Yandex Mail to Gmail.
- Step 1. Sign in to your Yandex Mail account.
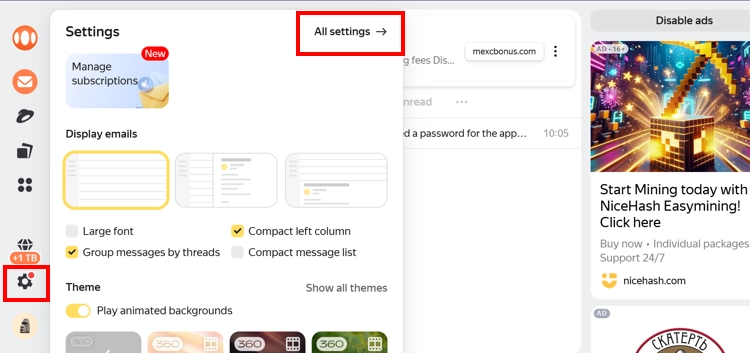
- Step 2. On the Home page, you should see a small gear icon in the lower left corner of the vertical menu ribbon; click it.
- Step 3. From the Settings pane, click the All settings arrow.
- Step 4. On the Main Settings page, choose the “Rules for processing emails” option.

- Step 5. Once you are in the Incoming mail filters section, click on the “Create filter” button.
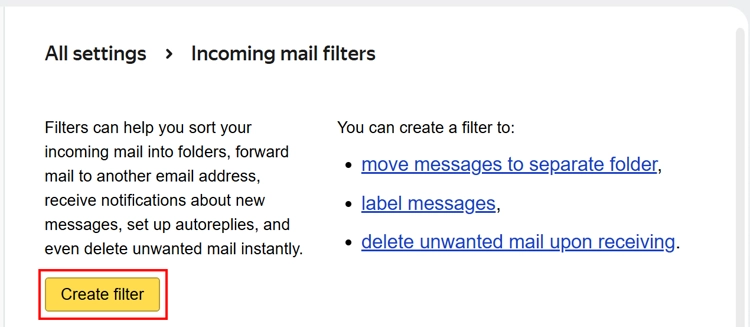
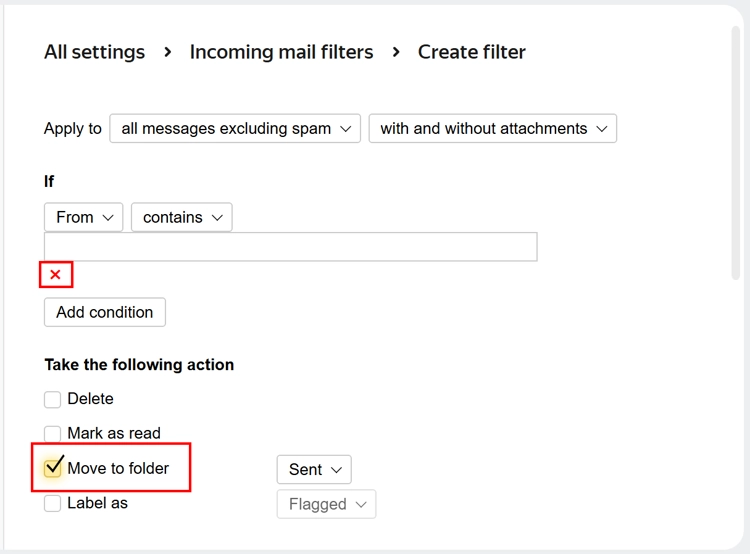
- Step 6. Then, on the filter options page:
- Keep the default options selected in the Apply to field.
- Cross the If filter
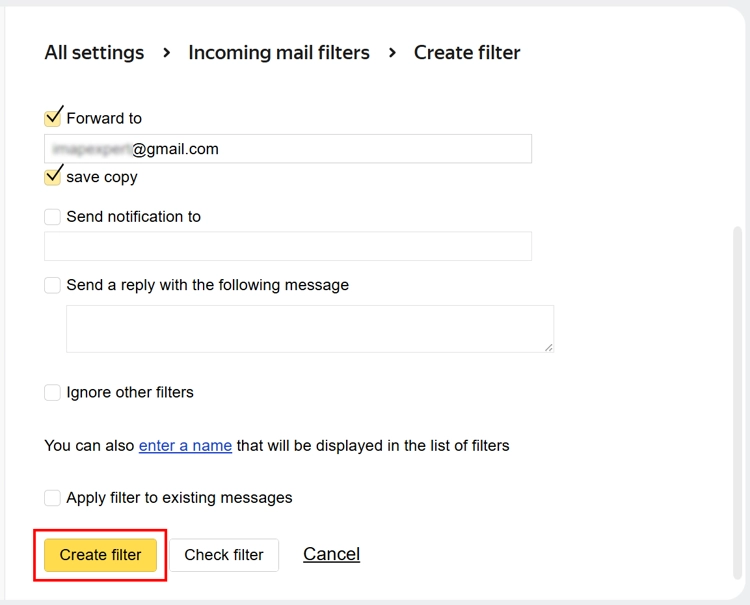
- Uncheck the “Move to folder” box and mark the “Forward to” option.
- Step 7. Scroll down and enter your @gmail.com address inside the blank field available right beside the option.
Step 8. (optional) Make the “save copy” checkbox if you wish to retain a copy of the message on your Yandex account, too. - Step 9. Then, click on the Create filter button.
When you create a new forwarding rule in Yandex, it will prompt for a credential validation, so complete it. However, the forwarding rule won’t work just yet; you need to confirm it.
How to Confirm the Yandex Forwarding Address in Gmail?
You must confirm the target Gmail address as the forwarded recipient; otherwise, you won’t be able to migrate Yandex mail to Gmail.
- Step 1. Log in to your Gmail account.
- Step 2. Check your Inbox for an email with the subject “Address confirmation for forwarding messages.”
- Step 3. If you dont find it in the Inbox, check the Spam folder.
- Step 4. Open the Mail and click the Confirm link.
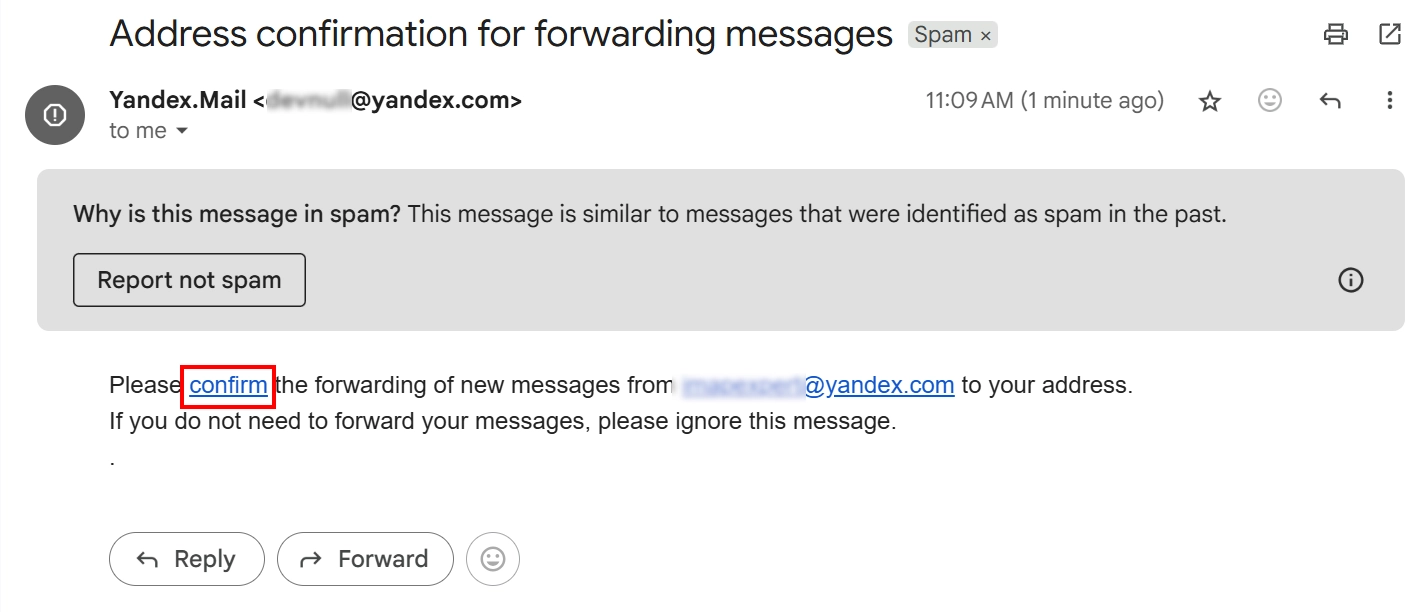
- Step 5. A new Tab will open, and you will have to confirm that you are not a robot (sometimes this second check is skipped)
- Step 6. Finally hit the Confirm forward button.
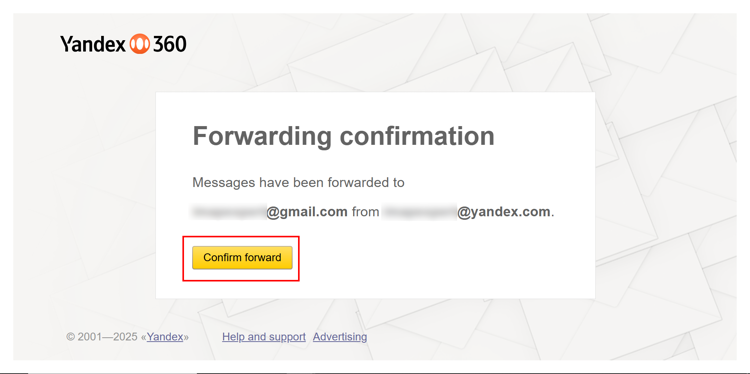
The page will refresh to show the forwarding successful message. Our job isn’t done yet; we still have to take care of the messages that were already in the Yandex account.
How to Manually Forward Existing Yandex Emails to Gmail?
The Yandex Forwarding rule you made can’t migrate Yandex Mail to Gmail that existed in your account before the rule formation. It only works on upcoming messages that are not flagged as spam. So you have to manually forward the rest of the messages on your own. Here is how you do it.
Step 1. Once you are inside the Yandex Mail home page, select an existing message that was not processed by the newly created forwarding rule.
Step 2. Click on the Forward arrow (or press Shift + F)
Step 3. A new Email draft opens. Enter your Gmail address in the To field and press Send.
Step 4. Repeat for the rest of the messages.
If forwarding seems like too much work, I will teach you how to use Gmail’s internal email pulling mechanism.
Ready the Source Account to Migrate Yandex Mail to Gmail
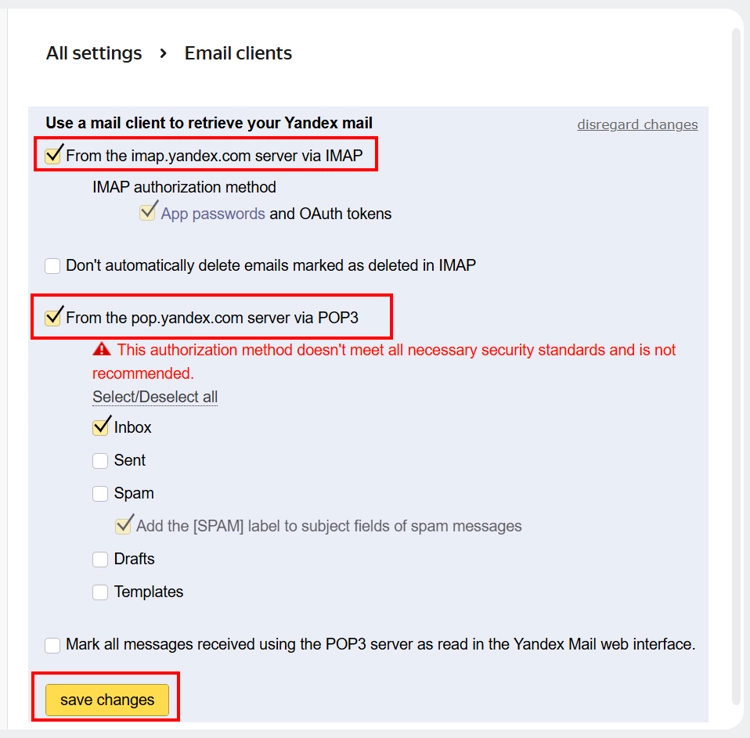
To use this feature, you must enable IMAP and POP in your Yandex account and also create an app password for your Yandex Mail account, as a regular password won’t work. Here is the procedure:
Step 1. Log in to your Yandex Mail account from any browser.
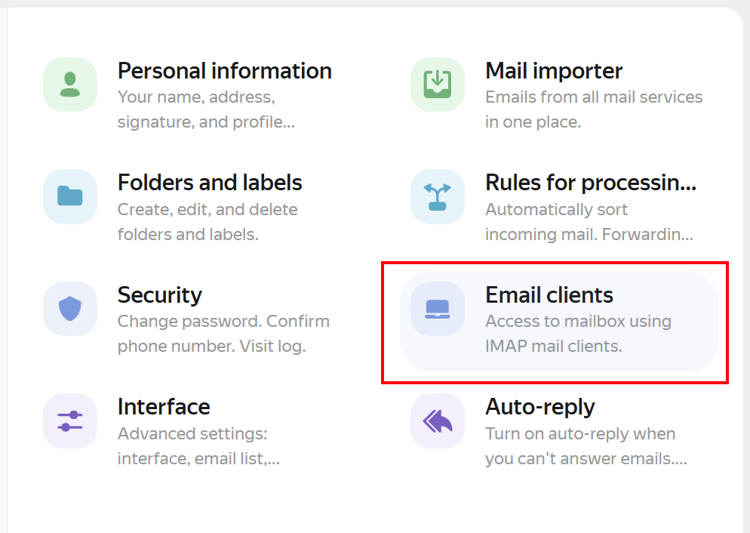
Step 2. On the Home page, you should see a small gear icon in the lower left corner of the vertical menu ribbon. Click it.
Step 3. From the Settings pane, click the All settings arrow.
Step 4. On the Main Settings page, click on the “Email clients” option.
Step 5. Check both IMAP and POP options, then press the save changes button.
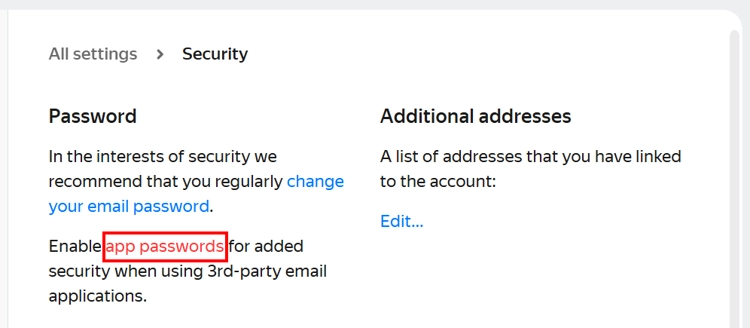
Step 6. Switch to the Security tab (via the side panel or retracing the settings options)
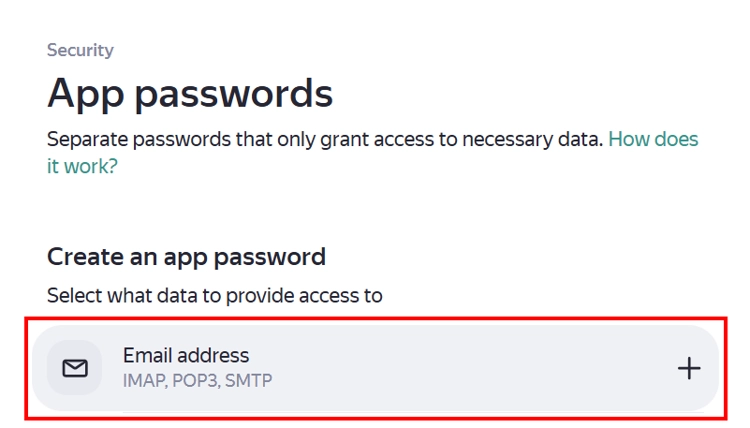
Step 7. Under the Password section, click on the “app passwords” link.
Step 8. Then, once you get to the App passwords page, click on the Email address option under the Create an app password sub-section.
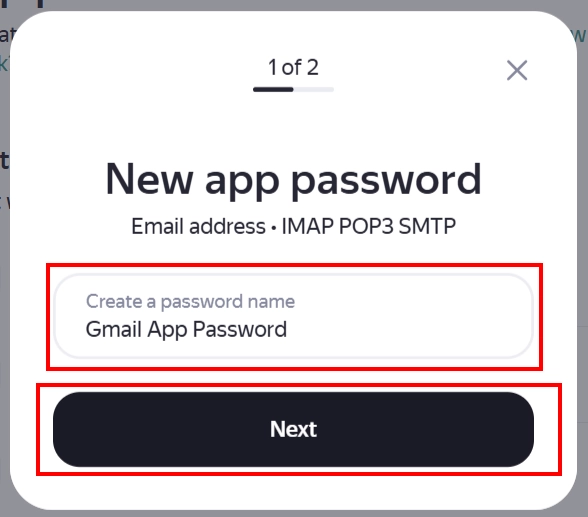
Step 9. A new Window appears on your screen. Type in a suitable name like “Gmail App Password” and press Next.
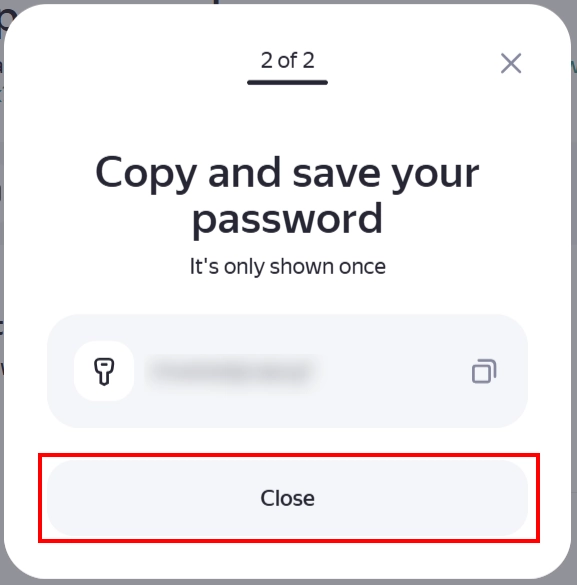
Step 10. Copy the app password and save it.
Use Gmail’s Email Import Facility to Bring in All Yandex Mails
Once you have the app password, open another tab on your browser and log in to Gmail.
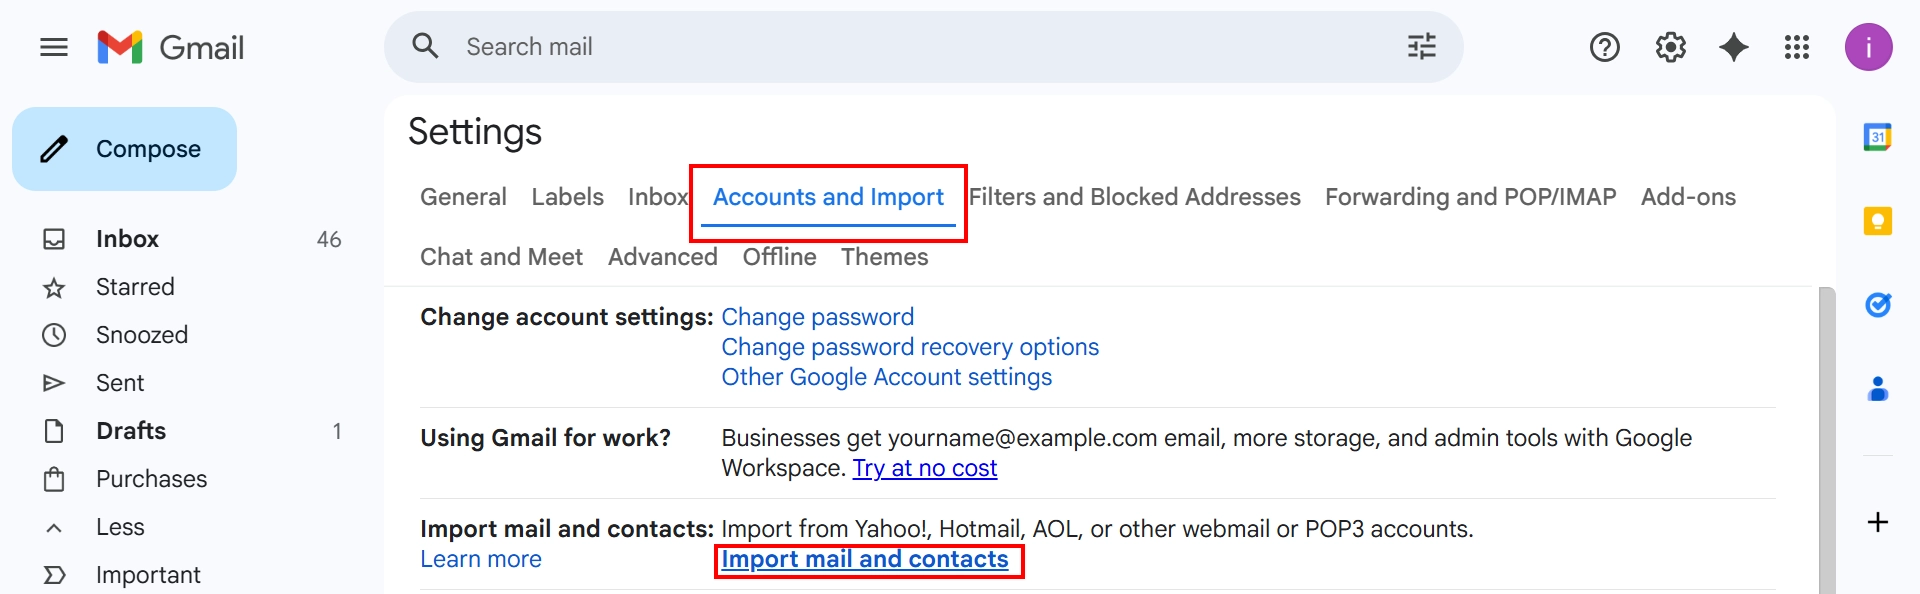
Step 1. Click on Settings > Choose See all settings and go over to the Accounts and Import tab.
Step 2. Then, click on the “Import mail and contacts” link to migrate Yandex Mail to Gmail.
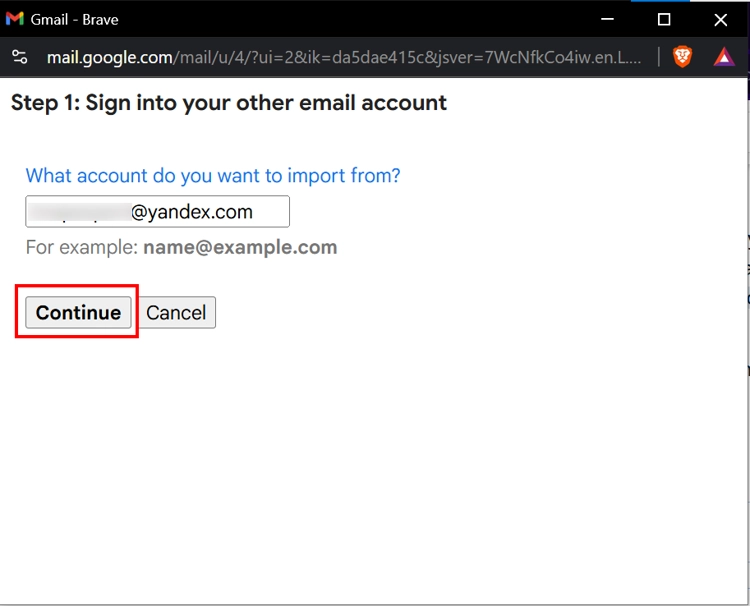
Step 3. A new window appears on the top right corner there, add your Yandex mail email address and hit Continue.
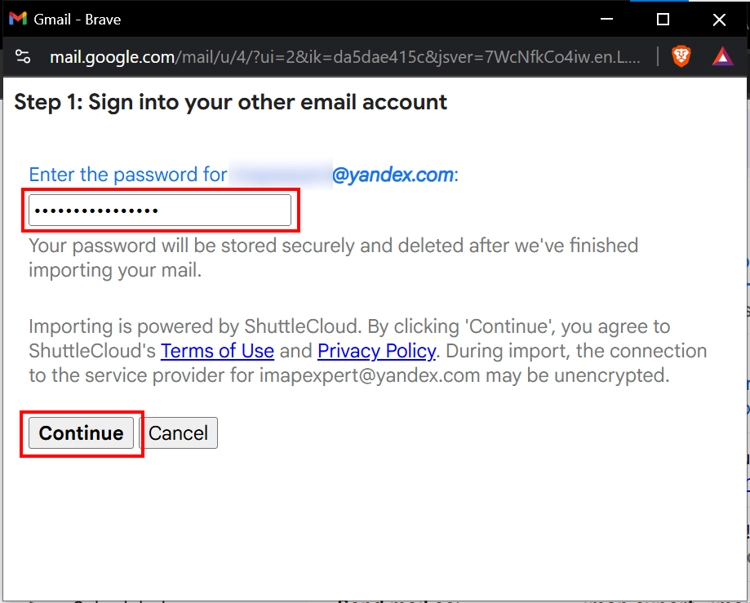
Step 4. Gmail may take up to a minute to check if the address you added is valid. Once the checking is complete, add the app password you made earlier for your Yandex account in the respective field and press Continue.
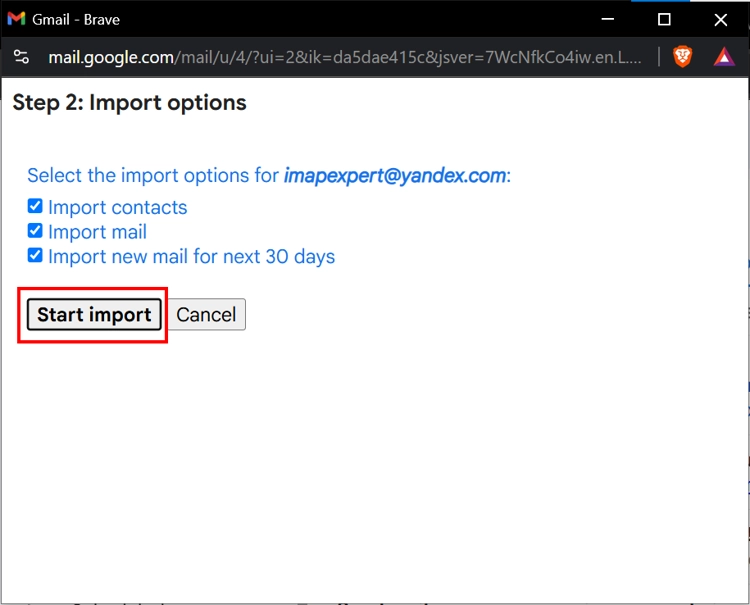
Step 5. Gmail will once again take a minute to verify the app password. Once it does, the box will show the Import options. Keep all options checked and press Start Import.
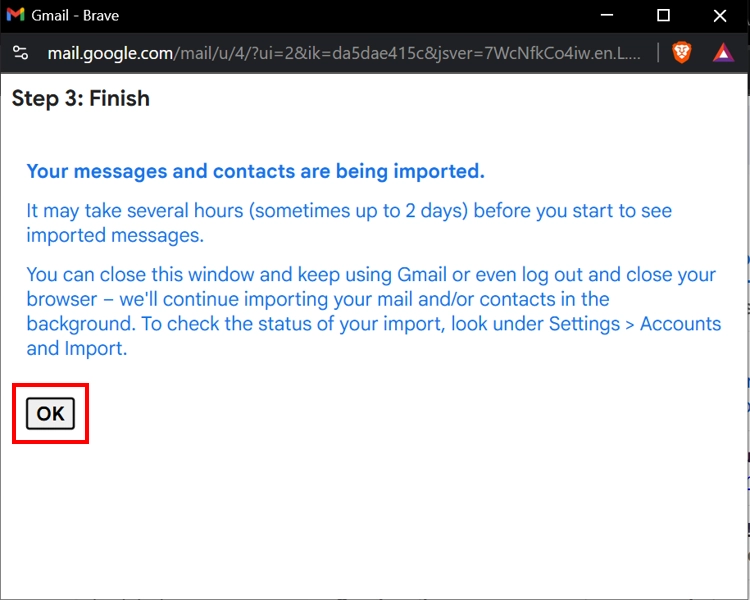
Step 6. Your messages start to import. Click on OK to close the import box.
Step 7. Soon, all of your Yandex Messages will start to show up in your Gmail account. If you have other accounts, I have made a detailed guide on moving from Yahoo to Gmail and Hotmail to Gmail migration. Be sure to check them out.
Use Email Client and Move Yandex Mail to Gmail
Step 1. Generate an App password for Gmail and your Yandex mail (Make sure that both accounts have the IMAP option enabled)
Step 2. Download and install any of the free-to-use email clients, like Thunderbird or Outlook
Step 3. Set up both your Accounts on the Email client one by one.
Step 4. Now open a second instance of the same email client and arrange both instances side by side in a split-screen arrangement.
Step 5. Keep Gmail towards the right side and Yandex towards the left.
Step 6. Now select a bunch of emails from the Yandex portion, and then drag and drop them into the Gmail account.
Step 7. Repeat till you have moved all of the messages from Gmail to Yandex.
If you don’t wish to use the Email client and still have to move multiple Yandex accounts to Gmail, I have a superb tool for you.
Best Way to Conduct Yandex to Gmail Migration
Use the Professional IMAP to IMAP Transfer Software and easily migrate all of your Yandex messages to Gmail. This tool is better than all of the manual methods due to the unique features it possesses. You get a dedicated date filter right in the setup screen. You can use it to migrate with surgical precision, only moving emails from a specific period and leaving the rest as it is.
The free CSV template you get in the tool can map multiple Yandex accounts to their Gmail counterparts simultaneously, so you can perform multi-account migration at the same time, saving time and effort. Not to mention, at the end of the migration, you get the option to generate reports and study the migration in its entirety. So what are you waiting for? Download a demo today on either Windows or Mac and follow these steps to migrate up to 100 emails for absolutely free.
Step 1. Install and start the tool on your machine. The IMAP endpoints and the email workload are preset; all you need to do is apply a custom date filter to migrate all Yandex Mail to Gmail. Press Next.

Step 2. On the source screen, toggle the dropdown and select Yandex from the list of various IMAP providers. The tool will fill in the rest of the details on its own. Just validate and press Next.
Step 3. Likewise, on the destination screen, choose Gmail as your target, Validate, and Press Next.

Step 4. The user mapping screen is where you can download the custom CSV, enter the correct account details, and re-upload it to the tool.

Step 5. Check the user list, prioritize the accounts you want the tool to migrate first, validate the settings, then Press Start Migration.

Conclusion
Here, I have provided the step-by-step process for completely migrating Yandex Mail to Gmail. From forwarding rules to email clients and Gmail’s built-in import feature, I discussed every option that is available. In our discussion, I also told you about the limitations of these manual processes and why the tool is by far the preferred choice. So use it and transition into the feature-rich Google ecosystem and leave Yandex Mail behind.
Frequently Asked Questions
Q. Will my forwarding rule apply to existing messages?
Although there is an option to “Apply filter to existing messages,” it does not work for forwarding messages; you have to manually forward all existing messages, either individually or in the form of attachments.
Q. I made my Yandex account part of my safe sender list in Gmail why does the confirmation mail still end up in my Gmail’s spam folder?
This is because you have only made an exception for a specific email address rather than the entire Yandex domain. To make sure no Yandex messages end up in spam, you should use the * wildcard instead of your username while creating the Gmail filter. Instructions for which are clearly explained in the blog.
Q. Is it safe to use *@yandex.com as my Gmail filter?
No, it’s not, as it will make your Gmail account vulnerable to actual spam originating from malicious @yandex.com email IDs. That is why setting up a forwarding rule is not the ideal method to conduct migration.
Q. Can I forward multiple Yandex messages to a single recipient at once?
Yes, but all the messages will transform into email attachments. If you are comfortable with this change, then perform mail migration from Yandex to Gmail by triggering a multi-message attachment forward.